|
| Teacher Sample |
 |
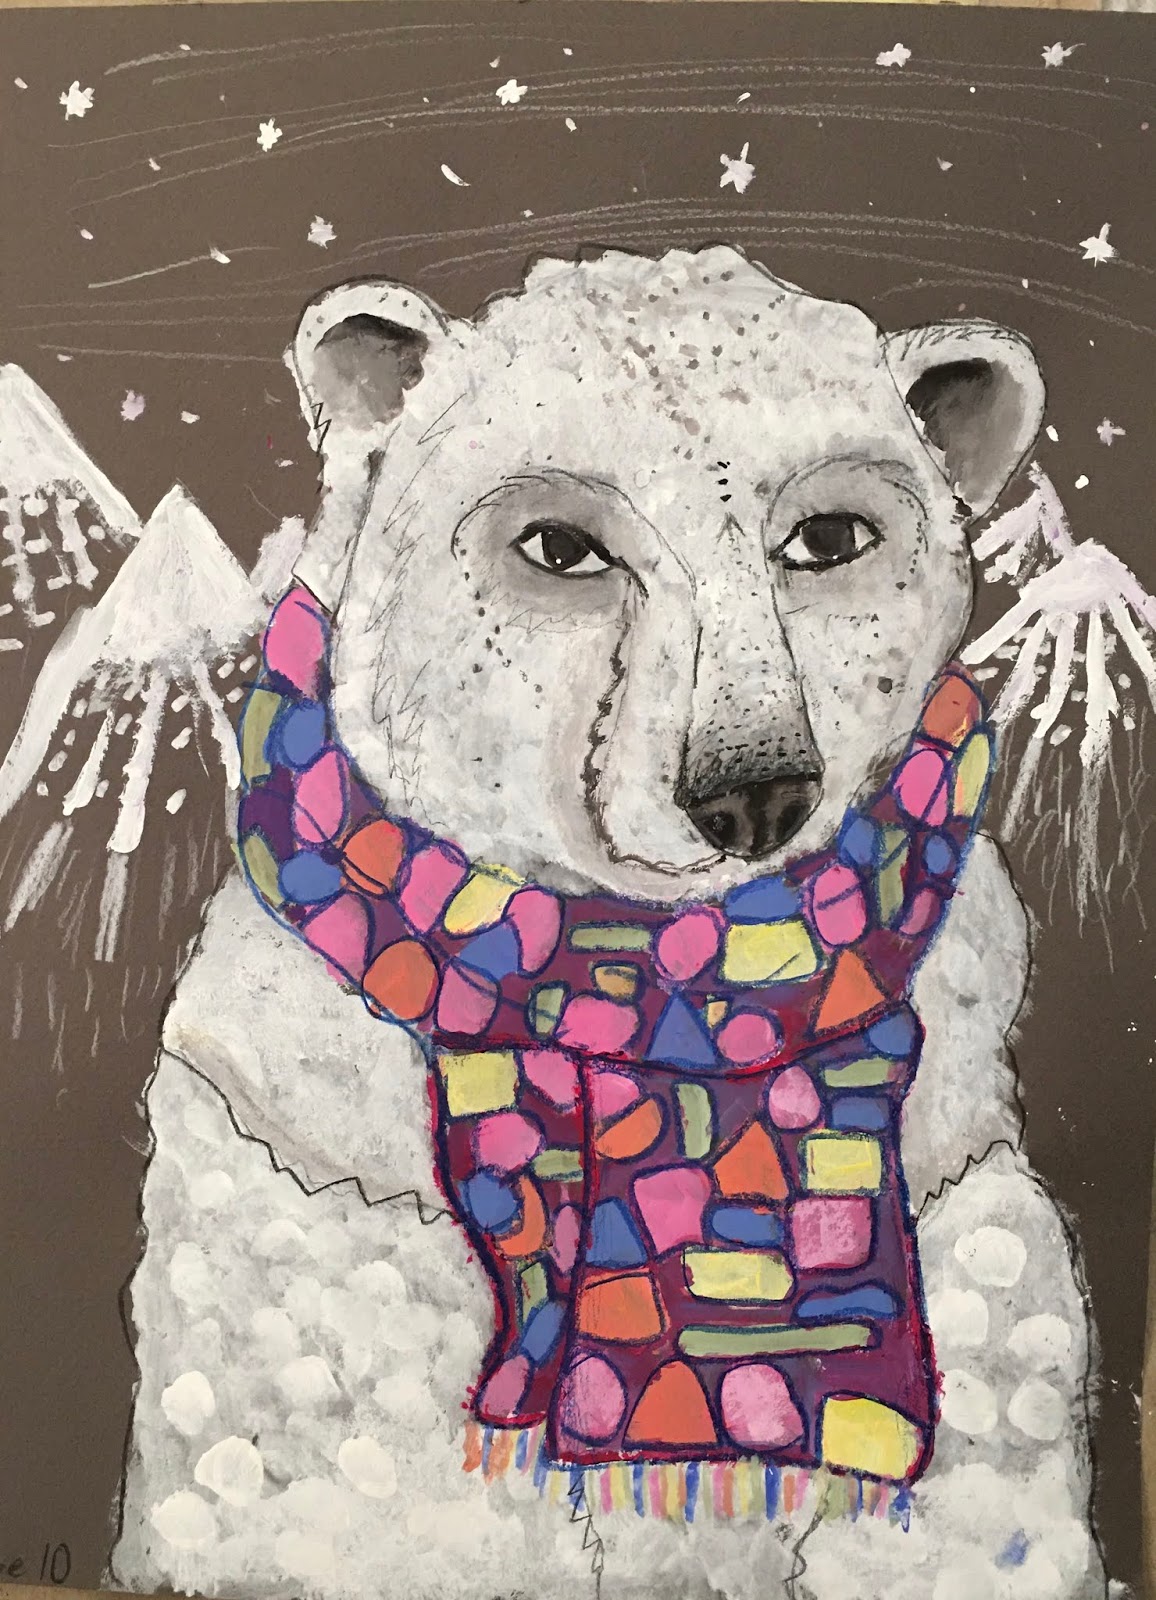
| Sandra Dieckmann's illustration |
For this project we strove to mimic Dieckmann's use of pattern, texture and whimsy detailing.
 |
| Ages 10-15 |
 |
| Ages 9-13 |
 |
| Kids ages 8-10 |
- Gouache can be used opaquely and transparently, and it can be layered light to dark and dark to light. It is like watercolor when diluted with water, and more like acrylic when used thickly.
- The consistency should always be cream-like, so the paint glides easily on the paper - just add a touch of water to your gouache on the palette, or keep your brush decently moist.
- When dry, gouache can be reactivated with a bit of water, so when layering, the color underneath can be reactivated and blended into the top color, smoothing transitions between them. If no blending is desired, lay the top color on more thickly.
- Your palette does not need to be washed, as you can just add some water to you colors and reactivate them at your next painting session. However, for a more creamy, thicker application, fresh paint from the tubes is better.
- White is your best friend in gouache. It allows us to push tones and values lighter, allows us to ease and blend transitions between colors, makes beautifully creamy tints, and makes colors more opaque for better coverage.
Tips for painting with gouache:
Always paint your large areas and base colors first, then add your smaller areas and detailing.
1. Start with your transparent washes of color, then add more opaque layers on top; or
2. If you start with more opaque paint, then start dark and go light, scrubbing in your lighter colors on top and blending in to the dark layers, so you slowly build up to the light tones and highlights.
Alright, on to our project.
DAY 1
Step 1: Paper choice
Students chose a grey toned paper in light to dark grey. We used Canson mis-teintes 50% cotton drawing paper in 160g/m2.
Step 2: Draw the bear at a 3/4 angle


Students where shown the difference between drawing a bear from the front, and one at a 3/4 angle. Eyes and nose fall on the horizontal and vertical lines, and follow the curvature of the lines. A guided drawing on the whiteboard showed them where to place the mouth (where the vertical and line and bottom of the circle meet). From there, the mouth, the ears and other details. We looked closely at the shapes and detailing in the features, for example, eyes are pretty small and ears are rounded.
The broad body begins at the ears and comes down and outward for a full, hefty bear.
The scarf also starts near the ears, wraps a few times around the neck and has folds and overlaps in it.
Step 2: Painting the bear
Students were given only white and black gouache paint. White was used for the white base coat all over the bear. Thicker paint was used where the bear is whiter, while thinner paint was used where the bear is more grey-white - this allows the grey toned paper to show through and creates a darker tonal value. Tiny amounts of black were used and blended into the white directly on the bear to create grey tones (around eyes, the snout, the ears).


 Adjusting values and adding texture:
Thicker applications of white (undiluted) were added anywhere the bear is bright white. With a small round brush, dabs of white paint were added on the bears face and body for a whimsy fur texture.
Step 3: Details
Eyes - Start with the whites of the eye. With black, paint the pupil, then the lids. A wet brush was used to dab along the edges of our black lines to smooth the transition from black to white and create grays. This creates a softer look, and creates realistic tonal values and shadowing. Nose contours and nostrils are painted in black and blended out toward the center of the nose area. With a moist brush, blend the black into the white upwards on the shaft of the nose for a soft grey tone. Add a touch of brownish pink to nose.
DAY 2
Step 1: Painting the scarf
Students created their own scarf patterns. Geometric patterns are highly recommended, as they are easier to paint, mindful of the fact that the scarf twists, turns and overlaps as it's wrapped around the bear's neck. Several patterns were displayed as examples.

Limiting palettes is always a good idea. It forces students to mix their colors for unique combinations, and leads to a more balanced and harmonious use of color.
Students chose 2-3 colors, plus back and white, and created as many combos with these as they wanted, cross-mixing, tinting and shading. Students painted their scarf pattern using one color at a time, striving for balanced placement of each color throughout the scarf, before switching to the next color (see example below in pink pattern). This saves time and paint since students are not rinsing their brush out each time between each application of a different color, and it leads to an overall more balanced color composition since each color is repeated several times, and is broadly placed throughout the scarf.


Step 2:
Contouring and Detailing
A dark blue or black colored pencil was used to emphasis the contours around and throughout the scarf. This makes our patterns look neater and bolder.
A black colored pencil was used to emphasize the contours of the bear's body. Dots, dashes and jagged strokes and other whimsy mark-making were added to mimic fur and to add a fun twist.
Step 3:
Background
Using either a white colored pencil or a detail brush with white paint, moutains and snow were added in the background. Some students used a toothbrush and white paint to spritz 'snow' in the background. Cover the bear with a scrap paper if doing this to prevent snow from getting on him.
This project took 2 classes, at 90-minutes each.
We enjoyed this project a lot. There's lots of room for individual direction and adjusting to different ages groups. Win-win. Thanks Sandra Dieckmann!!