Exploring and understanding graphite also provides a strong art foundation, which can easily translate to other art media: value, tone, form, highlights, shadows.... we address all of this with graphite, and we can use this knowledge in future painting or dry media projects.
We've done many dry media and drawing projects in the Art Room, but very few focussing on the properties of graphite. I knew I wanted a drawing project where graphite was in the forefront. With a drawing project also comes observation - teaching my art kids how to 'see' is one of my highest priorities - so I wanted a subject that they could relatively easily render using their observation skills and with simple graphite techniques.
Teddy bears are made up basic shapes (circles, cylinders), and if you don't get it 'just right', it will still look good. There is plenty of playing room for explorations of texture and values, and all kids love this cute plush toy. So, teddy bear it is!
 |
| Teacher Sample |
Materials:
-Good sketching paper.
*We used a slightly textured, yellow-beige paper, by Crayola. A little texture is key, as it grips and holds the graphite.
-2B and 4B graphite pencils
-Kneaded erasers
-Blending stubs
-Tracing paper (optional)
Process:
Students were shown dozens of photos and drawings of teddy bears. Each student chose one which he would draw. I also chose one, and set up a paper on the white board, on which I would demonstrate step-by-step how to draw, shade, blend, highlight and texturize our bear.
 |
| A few of our bear choices |
Using our 2B pencils, we then drew out our bear, following the basic shape break down, on our good drawing paper. We made sure to leave a thumbs-width of space at top, bottom and side of our paper for good composition. Students were encouraged to see exactly where the bears arms attach (at his neck!) and where the feet are placed (often blocking view of the legs). Seeing where one part of an object begins and where it ends is key when drawing by observation.
*I showed students how to hold their pencil when sketching (gripping it from top, and very loosely sketching with large, loose motions 'from the shoulder'. Sketching the head may require us to sketch out a circle shape 10 times before we get it 'right'. Students were NOT given erasers, so they had to sketch lightly, and ignore their 'unwanted' lines. When done, we went back over our 'good' lines with a slightly darker line.
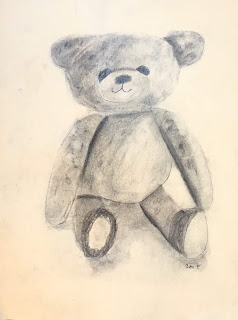
Using our 4B pencil, we now shaded all parts of our bear one section at a time, starting with the head, ears, snout and making our way down. I quickly showed students how to shade a sphere and a cylinder, so it looks 3-D (by following the shape of the contours, and by thinking about the form of our shapes), and then we were off.
Using a blending stub, we then blended all parts of our bear, following the same contour-following technique we used with our graphite, to maintain our 3-D form.
Eyes and nose were drawn in darkly, with reflection spots in our eyes (always!).
Student knew right away that something was 'off' with their bears at this stage. Their bear was all the same value, lacking any and all highlights and shadows! We had only created the bear's middle value at this point. Shadows and highlights are our next step.
Highlights:
Using a kneaded eraser, which we made to a point, we began 'lifting' up the graphite wherever we saw strong highlights on our bear photo. I like to say that the kneaded eraser is just another drawing tool, which allows us to 'draw' in the highlights. Some students had to be encouraged to add more highlights, or stronger highlights, to achieve greater contrast. Erasers were also used to 'dab' up some texture in our graphite.
Shadows:
Next, we took our 4B pencil again and began shading in the areas where there were strong shadows. These were most often under the arm, under the chin, between the legs and at the bottom of our bear, where the ears attach to the head, etc. These new shadow areas are also blended with a blending stub.
*Having students observe, observe and observe again is key. So often they think they are 'done' too soon. The more shadow and highlights they add, the more 3D their bears will look, so don't let them skimp on these steps. Once they see their bears come to life through strong shadowing and highlighting, they are super motivated to keep at it.
As an optional step, and if time allows, texture is added by lightly and minimally scrambling here and there with our pencil, or by picking up more graphite with a pointed kneaded eraser. This texture can also be blended with fingers or blending stubs.
Students then scanned their bear and compared it to their photo. They went back in and added more highlights, darkened shadows, and created more texture where they saw fit.
Eyes and nose were darkened. We found a darker graphite (6B, for example) was best for this step, for a stronger contrast.
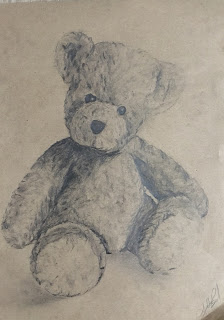
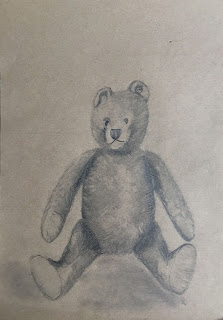
These all turned out so well, and are all so adorable. Students were surprised at how realistically they were able to render their bears.
 |
| Kids 8-14 years |
 |
| Kids 9-11 years |
 |
| Kids 7-9 years |
 |
| Adult class |
 |
| Aditri 8 |
 |
| Zoe 9 |
 |
| Yiming 7 |
 |
| Daniel 9 |
 |
| Mathilda 7 |
 |
| Rune 7 |
 |
| Sif 10 |
 |
| Ciara 8 |
 |
| Marko 14 |
 |
| Dasheng 11 |
 |
| Ella 11 |
 |
| Sofia 9 |
 |
| Liv 10 |
 |
| Skye 9 |
 |
| Ben 10 |
 |
| Phoebe 10 |
 |
| Anastazia 9 |
My adults also really enjoyed this project. They worked on a larger format and on darker paper.
Their results are below.
My Australian student chose to draw a koala bear!


