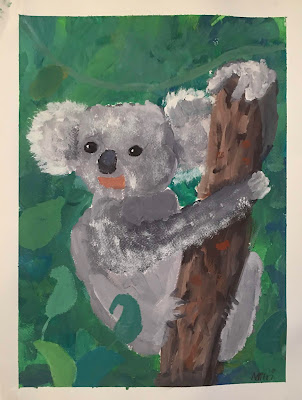
We completed several gouache projects over the last semester and last year, so my kids have a pretty good understanding of the qualities of gouache. Most of our projects involved an introductory guided drawing lesson, to help them visualize and map out the features and placement of our subject matter. This time, however, I decided I would set them off completely on their own, and NOT do a guided drawing to begin our lesson. Instead, each student was to choose a photograph of a koala that they liked, and they would have to draw this by observation on their own. The intention here, is to release the responsibility of drawing to them, to make them more independent artists, and to have them produce more original art work.
Well, there was some nervous freaking out at first when I told them: you're on your own! But this tension subsided when I reminded them how to look for placement and sizing of their sibject. Their koala should be LARGE, centered, drawn out in basic shapes with head and facial features first, then body, then refined for detail.
Observation observation observation!
Granted, there was lots of individual urging and reminding to look for exact shapes and size relationships, in order to get things 'right'. In the end, we did alright. The pride that comes from creating unique art, independently, is powerful.
 |
| Teacher Sample |
 |
| Teacher sample in progress |
 |
| Teacher sample in progress |
 |
| Class collage. Kids ages 8-10 |
Drawing by Observation:
Students chose a koala photo they wished to paint. I printed out many options for them. They drew out their bear in pencil, large and centered. We started with head, eyes and nose, then body and arms and legs. The koala must be on a branch.
Background and Branch:
We used a limited palette of blues, greens, yellow, ochre, brown, black and white.
Starting with the background, we painted a blotchy, "tiled" effect using a flat edge brush. Dipping into our colors and mixing directly on the paper, and painting using an "x" motion to create blocky texture, we moved our colors around our paper, adding more white for tints, more blues for darker blues and darker greens for deeper tones.
Our object: to create a textured background reminiscent of a dense, leafy forest.
The branch was painted in browns, with the addition of ultramarine blue mixed with brown for a deeper shadowy tone. Again, white was mixed with our browns to create lighter, highlighty areas. Tints, tones and shades of browns were mixed directly on our paper, not in our palettes. Students were encourages to observe the different textures and tones in their tree branch reference photo.
This was all we managed in day 1 (90 minutes).
Koala painting:
Using only burnt umber brown and ultramarine blue we created a natural grey color. With the addition of black and white, we darken and lighted our greys. We began by painting an overall mid-tone of grey around our bear, then dipped our brush into white and painted over top our grey in order to create lighter grey values. More white was layered over top where the bear is even lighter. Similarly, we worked in darker areas by using more dark grey where the bear is darker. We used a dabbing technique with our brush to mimic the fur texture. Students were continuously encouraged to observe their photo closely and look for changes in grey value, in order to create dimension.
Eyes and nose:
Using a small detail brush we painted the eyes using only a mix of ultramarine blue and burnt umber brown. We created a lighter brown-grey for the eye ball, and very darker grey-browns for the eye contour, with black for the pupil and white for the reflection spot. The nose is also a very deep brown-grey, with the addition of blue-grey at the nose bridge for dimension.
Dry brush texturizing:
With a dry brush technique using a bristle brush, we very lightly stippled and dabbed white over top where the bear is very light, like at the ears, forehead, around the eyes, bridge of nose, and wherever the bear is lighter. This dry brush technique also mimics the unique fur texture of the koala bear, which appears a bit stippled.
Foreground leaves:
Lastly, students added eucalyptus leaves in the foreground, coming in from at least three sides, with some overlapping. Student were to mix many different greens for maximum variety and interest.
This project took 2 90-minute classes.


