
 |
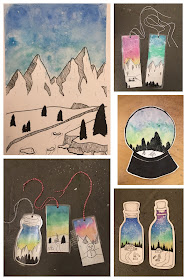
| Student work |
I discovered Baltimore-based artist and illustrator Jen Aranyi on Instagram a while back. Pen and watercolor is a favorite media combination of mine, so her work really resonated. I've done many projects with my students over the last year using these two media together, and I knew my kids would love her work. So, when I wanted a quick one-class winter-inspired project, I knew this was it. To build a holiday gift option into the project, I decided to give the kids the option of making bookmarks..... so I dusted off my lamination machine and off we were!
Jen Aranyi works in small format, so we did too. This also allowed us to each do two illustrations, which the kids loved. How often do they get to go home with two artworks!?
Process:
We discussed Jen Aranyi, her work, her use of line, her subject, her media and her watercolor technique. My kids knew right away that the watercolor sky was done wet-on-wet, and that she used white gel pen (and maybe salt?) to add texture and stars in her sky. The artist actually uses a watercolor pen brush (which we don't have), but a wet-on-wet technique with a normal paint brush does the job just fine.
I passed around many printed visuals of Jen's work. Students took inspiration from several of her works and created an original piece. They sketched out a few ideas on scratch paper.

Objectives:
Students could make either 2 bookmarks (roughly 2.5x8 inches), or 1 larger illustration (A5 size = roughly 5.5 x8 inches)... If time allowed, one more bookmark could be made.
Students had to think carefully about detail, line quality and pen techniques (stippling and hatching). As always when using fine liners, we use various point widths (from 0.1-0.8). Larger widths are used for the bolder or main part of our illustrations (contours of the mountains, dark evergreen trees), and smaller widths are used for smaller subjects, details or texture (crags and line texture in the mountains, small cabins or houses, etc.)
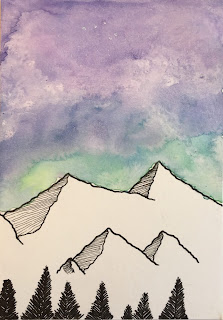
Most students wanted to include a mountain in their illustration, as this is a Jen Aranyi classic. I demonstrated on the white board how to draw the mountains with their textured side. I had students start at the mountain's highest peak, draw a jagged line downwards and then back up to the neighboring mountain's low peak (see example below). This space is then carefully shaded using closely spaced lines (hatching). Students got this pretty quickly, with a little practice. Minimal stippling was used here and there for added texture in the mountains and elsewhere in the illustration.
Then I showed students a few videos of Jen painting. She posts a lot of quick videos on Instagram showing her process. They found this fascinating and were super exited to begin on their own piece. See an example of her process here.
We got to work. Students first drew their mountain or other main subject in permanent fine line markers, then watercolored their sky. We used analogous colors and started at the bottom of the sky in a light color (for example yellow) and worked our way upwards to a darker color (dark blue).
We dabbed with a tissue for texture in the sky (the milkyway, clouds, or nebula), and sprinkled salt.
Then we moved on to our details at the bottom of our illustration. Once the sky was dry we added evergreen trees using a wider tipped fine-tip marker, and any other details were added to our scene.
Final touches: Students added stars in the sky with a white gel pen.
The bookmarks were laminated and hole punched, and students chose a string to pull through it.
Super fun and pretty quick. Many of my students went home so inspired that they kept making more and more of these illustrations and book marks on their own. This is the best feeling for a teacher: setting kids off on their way to be independent and curious artists! Thanks Jen Aranyi!


Jen Aranyi works in small format, so we did too. This also allowed us to each do two illustrations, which the kids loved. How often do they get to go home with two artworks!?
Process:
We discussed Jen Aranyi, her work, her use of line, her subject, her media and her watercolor technique. My kids knew right away that the watercolor sky was done wet-on-wet, and that she used white gel pen (and maybe salt?) to add texture and stars in her sky. The artist actually uses a watercolor pen brush (which we don't have), but a wet-on-wet technique with a normal paint brush does the job just fine.
I passed around many printed visuals of Jen's work. Students took inspiration from several of her works and created an original piece. They sketched out a few ideas on scratch paper.

Objectives:
Students could make either 2 bookmarks (roughly 2.5x8 inches), or 1 larger illustration (A5 size = roughly 5.5 x8 inches)... If time allowed, one more bookmark could be made.
Students had to think carefully about detail, line quality and pen techniques (stippling and hatching). As always when using fine liners, we use various point widths (from 0.1-0.8). Larger widths are used for the bolder or main part of our illustrations (contours of the mountains, dark evergreen trees), and smaller widths are used for smaller subjects, details or texture (crags and line texture in the mountains, small cabins or houses, etc.)
Most students wanted to include a mountain in their illustration, as this is a Jen Aranyi classic. I demonstrated on the white board how to draw the mountains with their textured side. I had students start at the mountain's highest peak, draw a jagged line downwards and then back up to the neighboring mountain's low peak (see example below). This space is then carefully shaded using closely spaced lines (hatching). Students got this pretty quickly, with a little practice. Minimal stippling was used here and there for added texture in the mountains and elsewhere in the illustration.
Then I showed students a few videos of Jen painting. She posts a lot of quick videos on Instagram showing her process. They found this fascinating and were super exited to begin on their own piece. See an example of her process here.
We got to work. Students first drew their mountain or other main subject in permanent fine line markers, then watercolored their sky. We used analogous colors and started at the bottom of the sky in a light color (for example yellow) and worked our way upwards to a darker color (dark blue).
We dabbed with a tissue for texture in the sky (the milkyway, clouds, or nebula), and sprinkled salt.
Then we moved on to our details at the bottom of our illustration. Once the sky was dry we added evergreen trees using a wider tipped fine-tip marker, and any other details were added to our scene.
Final touches: Students added stars in the sky with a white gel pen.
The bookmarks were laminated and hole punched, and students chose a string to pull through it.
Super fun and pretty quick. Many of my students went home so inspired that they kept making more and more of these illustrations and book marks on their own. This is the best feeling for a teacher: setting kids off on their way to be independent and curious artists! Thanks Jen Aranyi!


